
You've poured hours into making your product. You've opened an Etsy shop. And now you're staring at your phone wondering why your listing photos look nothing like the polished images from top sellers. You're not alone — most new Etsy sellers hit this wall early, and many give up before they figure out that great product photos for Etsy do not require a camera, a studio, or a photographer.
Your phone already has everything you need. The difference between blurry, washed-out shots and scroll-stopping images comes down to a handful of techniques that anyone can learn in an afternoon. This guide walks you through the exact setup, lighting, and composition steps to take product photos for Etsy with your phone — photos that look professional and actually move buyers to click "Add to Cart."
Why Product Photos for Etsy Matter More Than Anything Else in Your Listing
Before getting into technique, it helps to understand what's at stake. Etsy search results display as a grid of thumbnail images. Buyers don't read your title or price first — they respond to images. Research from Etsy's own seller education confirms that listing photos are the single biggest factor in whether a shopper clicks through or keeps scrolling.
Strong product photos do three things: they show the item clearly, they signal quality, and they help buyers imagine owning the product. Weak photos do the opposite, no matter how good the item actually is. The goal of every photo session is to earn that click.
Set Up the Right Lighting for Etsy Product Photos
Lighting is the most important variable in phone photography. Bad lighting creates harsh shadows, muddy colors, and flat textures. Good lighting makes your product look three-dimensional and accurate to real life.
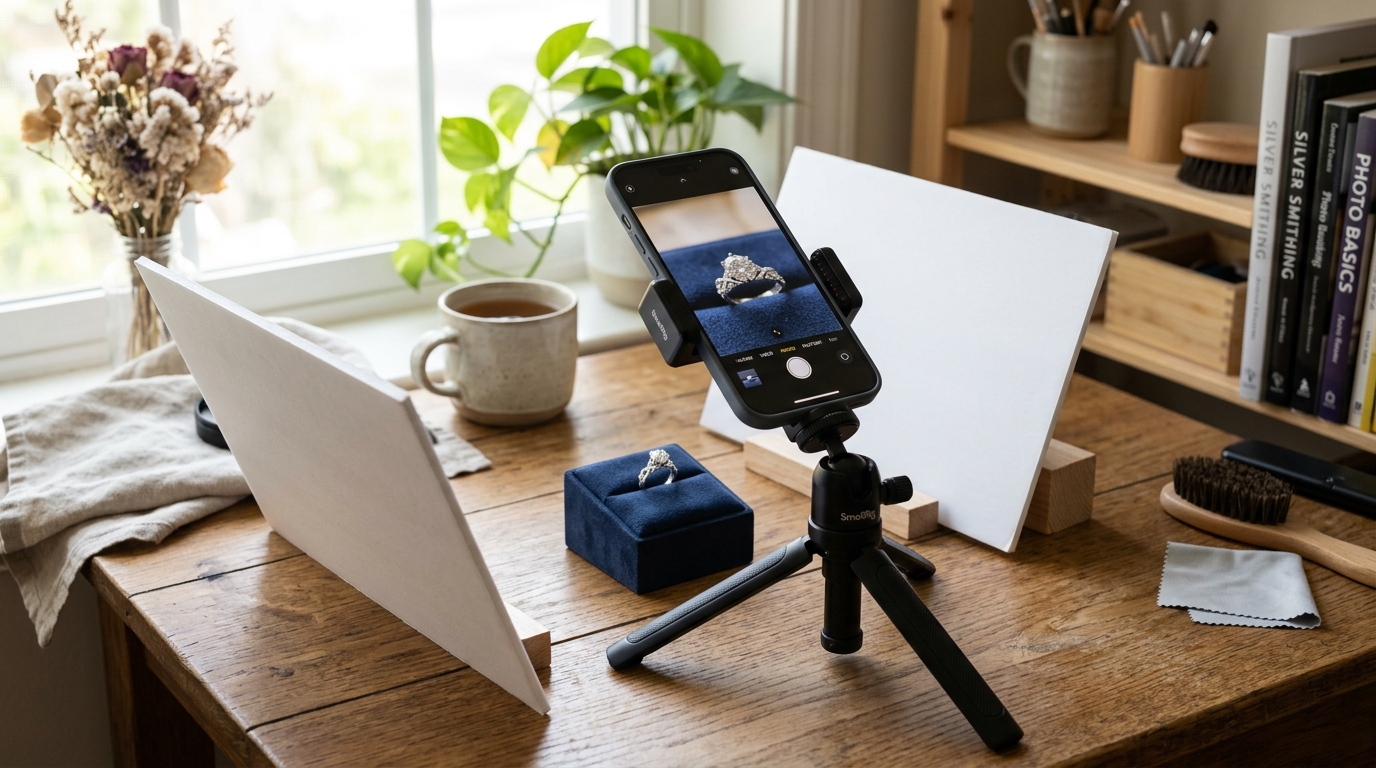
Natural light from a window is the best free light source available. Set up your shooting surface — a table, a piece of cardboard, a cutting board — within two to three feet of a window. You want the light coming from the side, not directly above. Overcast days produce the softest, most even light; direct midday sun creates shadows you'll struggle to eliminate.
If natural light is inconsistent where you live, a ring light or two small LED panels (available for under $30 each on Amazon) give you reliable, controllable light. Point one light at your product from a 45-degree angle. Use a piece of white foam board on the opposite side to bounce light back and fill in shadows. This two-point setup works for jewelry, candles, ceramics, textiles, and almost every category of handmade goods.
Avoid using your phone's flash. It flattens the product and blows out highlights. If you're in a low-light space, it's better to buy a cheap LED panel than to shoot with flash.
Choose the Right Background for Your Product Photos
Your background should never compete with your product for attention. The most reliable choices for product photos for Etsy are white, off-white, light gray, and natural textures like wood, linen, or marble-patterned contact paper.
A seamless white background works for almost every product category and makes your item pop in Etsy's grid. You can create one with a $3 sheet of white poster board from a craft store. Tape it to a wall and let it curve down onto your shooting surface so there's no visible seam.
Textured backgrounds work well when you want to communicate a brand aesthetic — rustic wood for handmade goods, clean marble for cosmetics and candles, linen for clothing and accessories. The rule is that the background should complement the product's color palette, not clash with it.
Avoid busy backgrounds, patterned fabrics, and anything with text or logos. They distract the eye and make your listing look unprofessional.
How to Use Your Phone's Camera Settings for Better Etsy Photos
You don't need to shoot in manual mode or understand aperture and ISO. A few simple adjustments in your phone's native camera app will make a real difference.
First, turn off HDR mode. HDR processing can flatten colors and make products look unnatural. Shoot in standard photo mode instead. Second, tap on your product in the camera frame to set the focus and exposure manually. Your phone will lock focus on whatever you tap, and you can slide the exposure up or down from that point. Third, use your phone's grid overlay (usually in camera settings) to align your shots. Turn on the grid and use the rule of thirds to place your product slightly off-center for a more visually interesting composition.
Avoid using digital zoom. Instead, physically move the camera closer to your product. Digital zoom degrades image quality. If you're shooting small items like jewelry or earrings, check whether your phone has a dedicated macro mode — many recent iPhone and Android models do.
Use a tripod or prop your phone against a stable surface. Even slight camera shake blurs fine details. A $15 flexible tripod from Amazon attaches to shelves, window sills, or chairs and pays for itself immediately in sharper photos.
Shoot Multiple Angles and Lifestyle Shots
Etsy allows up to 10 listing photos, and you should use most of them. Buyers can't touch or pick up your product, so your photos need to do that work. A complete set for most products includes a clean hero shot on a white background, a close-up showing texture or detail, a scale shot showing the item next to something familiar (a hand, a coin, a common object), a lifestyle shot showing the product in use or in context, and a photo showing packaging.
Lifestyle shots are especially important for items like clothing, home decor, and gifts. If you sell candles, photograph them lit in a cozy scene. If you sell tote bags, show one being carried. Buyers respond to images that help them picture the product in their own lives.
For the hero shot that appears as your main listing thumbnail, keep the background clean and make sure the product fills at least 85 percent of the frame. Etsy's algorithm and buyer behavior both favor clear, high-contrast thumbnail images.
Edit Your Etsy Product Photos Without Spending Money
Even good phone photos benefit from light editing. The free versions of Lightroom Mobile, Snapseed, and even your phone's built-in Photos app give you enough tools to polish your images.
After shooting, adjust the brightness so the product is clearly visible without highlights blowing out. Increase contrast slightly to make the product pop. Bring up the whites on a white background so it looks clean, not gray. Avoid heavy filters — they change the product's color and lead to buyer complaints when the item arrives looking different from the photo.
Crop each image to a square (1:1 ratio). Etsy displays listing images as squares, and non-square images get cropped automatically in ways you can't control. Cropping manually lets you choose exactly what's visible in the grid view.
For color accuracy, compare the edited photo to the actual product under normal indoor light. If the photo looks warmer or cooler than the real item, adjust the temperature slider until they match. Accurate color reduces returns and negative reviews.
Common Mistakes That Undermine Etsy Product Photos
Even sellers who follow most of the steps above still make a few recurring mistakes worth naming.
Shooting from straight above is one of the most common. It works for flat lays, but for three-dimensional products it eliminates depth and makes items look flat. Shoot from a slight angle — roughly 30 to 45 degrees above the product — to show dimension and shape.
Inconsistent styling across photos is another. If your hero shot is on white and your other photos use three different backgrounds, the listing feels disjointed. Pick one or two backgrounds and stick with them across all photos in a listing.
Cluttered props are a third. Props can add context and style, but too many props pull attention away from the product. If a viewer has to search the frame to find what's being sold, you've lost them.
Finally, low-resolution images hold back a lot of sellers. Make sure your phone camera is set to its highest resolution. Etsy recommends images of at least 2000 pixels on the shortest side. Modern smartphones shoot well above this by default, so check that your camera app isn't set to a compressed or lower-quality mode.
Ready to Transform Your Etsy Product Photos?
ClickReadyAI turns one product photo into six professional, Etsy-ready images in minutes — no studio, no Photoshop, no experience required. Over 500 Etsy sellers use it to produce listing-ready images that convert.
Start your free 10-day trial — no credit card required.
Frequently Asked Questions
What is the best phone for taking Etsy product photos? Any modern smartphone from the last three years takes photos good enough for Etsy listings. iPhone 13 and newer, Samsung Galaxy S21 and newer, and Google Pixel 6 and newer all produce excellent results. The technique and lighting matter far more than the specific phone model.
Do I need a special app to take product photos for Etsy with my phone? No. Your phone's native camera app is sufficient for shooting. For editing, the free version of Lightroom Mobile or your phone's built-in editing tools handle everything most sellers need.
How many photos should I include in an Etsy listing? Etsy allows up to 10 photos per listing. Aim for at least five: a clean hero shot, a detail or close-up shot, a scale reference shot, a lifestyle shot, and a packaging shot. More photos give buyers more confidence and reduce uncertainty before purchasing.
Why do my Etsy product photos look yellow or orange? Yellow or orange tones come from warm artificial lighting, like incandescent bulbs or warm-toned LED strips. Shooting near a window in daylight, or using daylight-balanced LED panels (rated around 5500K), produces accurate, neutral colors. You can also correct warm tones in editing by lowering the temperature slider.
How do I photograph shiny or reflective products like jewelry? Reflective products need diffused light. Avoid direct light sources, which create harsh specular highlights. Use a lightbox (a folding photo tent available for under $25) or shoot near a large north-facing window on an overcast day. A white foam board reflector on the shadow side fills in detail without adding a mirror-like reflection.